 Pin It
 The first time I attempted a lattice weave with apples, I was terrified. My grandmother had done it with such fluid grace when I was small, and I'd spent years assuming it required some culinary magic I'd never possess. One October afternoon, I pulled out a mandoline, some firm apples, and decided to stop making excuses. What surprised me most wasn't the difficulty—it was how meditative the process felt, how each thin slice became part of something larger and more beautiful than I expected.
I made this for a dinner party where conversation had run thin, and something shifted when I brought it to the table. A friend who'd been quiet all evening leaned forward, genuinely curious about how the lattice stayed so precise. We ended up talking about small acts of care in cooking, about why taking time with something matters. That tart became less about impressing and more about connection.
Ingredients
- All-purpose flour (1 1/4 cups): The foundation of your crust—keep it cold and work quickly so the butter stays distinct and creates those tender, flaky layers.
- Unsalted butter, cold and cubed (1/2 cup): Cold butter is your secret weapon for a crust that actually shatters when you bite it; room-temperature butter gives you paste instead.
- Granulated sugar (2 tbsp for crust): Just enough sweetness to complement without overpowering the filling and apples.
- Salt (1/4 tsp): Brings out all the other flavors, especially important in a simple crust.
- Ice water (3–4 tbsp): Add it gradually; too much and your crust becomes tough, too little and it won't hold together.
- Walnuts, chopped (1 cup): Toast them first if you want deeper flavor, though raw works perfectly fine too.
- Honey (1/4 cup): Not just sweetness—it adds moisture and a subtle floral note that the apples love.
- Light brown sugar (2 tbsp): Softer than granulated, it dissolves into the filling and keeps everything moist.
- Ground cinnamon (1/2 tsp for filling, 1/2 tsp for apples): Cinnamon and apples are a partnership that needs no explanation.
- Salt (1/8 tsp for filling): A small pinch that elevates everything else.
- Firm, sweet-tart apples like Honeycrisp or Granny Smith (3 large): Honeycrisp gives you juicy sweetness, Granny Smith keeps you honest with tartness—use whichever you trust to stay tender but not collapse.
- Lemon juice (1 tbsp): Prevents the apples from browning and adds bright acidity that cuts through the honey beautifully.
- Granulated sugar (2 tbsp for apples): Caramelizes just slightly on the edges during baking.
Tired of Takeout? 🥡
Get 10 meals you can make faster than delivery arrives. Seriously.
One email. No spam. Unsubscribe anytime.
Instructions
- Heat your oven and prep your pan:
- Set the oven to 375°F. Grease your tart pan or pie dish well—you want nothing sticking later when you're admiring your work.
- Build the crust:
- Combine flour, sugar, and salt, then cut in cold butter pieces until everything looks like coarse breadcrumbs with some pea-sized bits still visible. This texture is what gives you layers. Add ice water one tablespoon at a time, stirring gently until the dough just barely holds together—it should still look a little shaggy.
- Fit the crust:
- Press the dough evenly into the pan, working it up the sides with your fingertips. Prick the bottom all over with a fork to prevent puffing, then chill for 15 minutes while you gather your filling ingredients.
- Blind bake for structure:
- Line the chilled crust with parchment and fill with pie weights or dried beans to keep it from bubbling up. Bake for 12 minutes, then carefully remove the weights and parchment and bake another 5 minutes until the edges are just starting to turn pale golden. The crust should feel set but not hard.
- Create the walnut filling:
- While the crust cools slightly, mix chopped walnuts with honey, brown sugar, cinnamon, and salt. Spread this mixture evenly over the warm crust—the warmth helps the honey flow and distribute.
- Slice the apples paper-thin:
- Peel your apples if you prefer (I usually do, but the skins are perfectly fine), then core them and slice as thinly as you possibly can—aim for just under 1/8 inch thick. A mandoline is your friend here, but a sharp knife works too; just take your time. Toss the slices with lemon juice, sugar, and cinnamon as soon as you slice them to prevent browning.
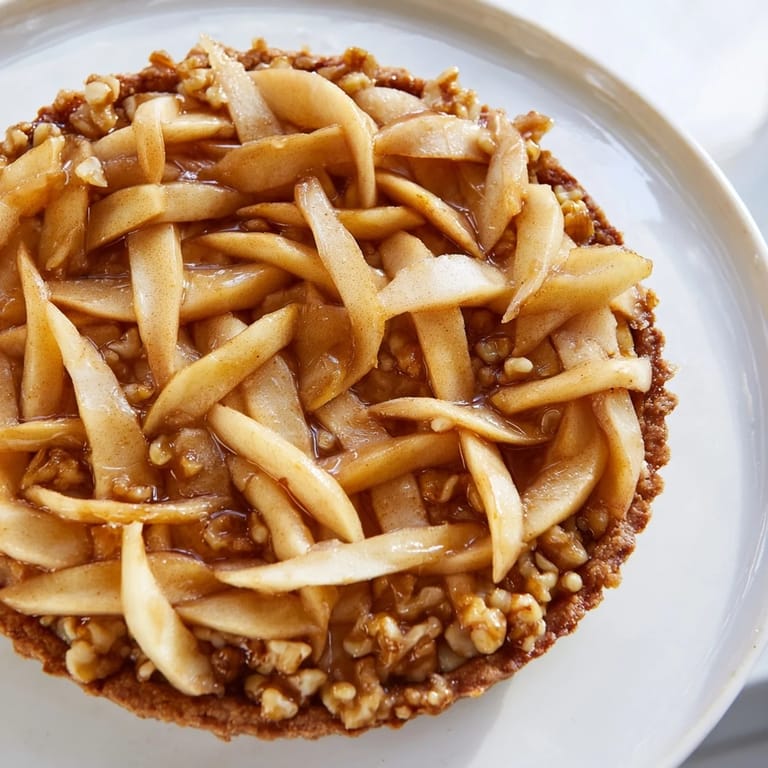
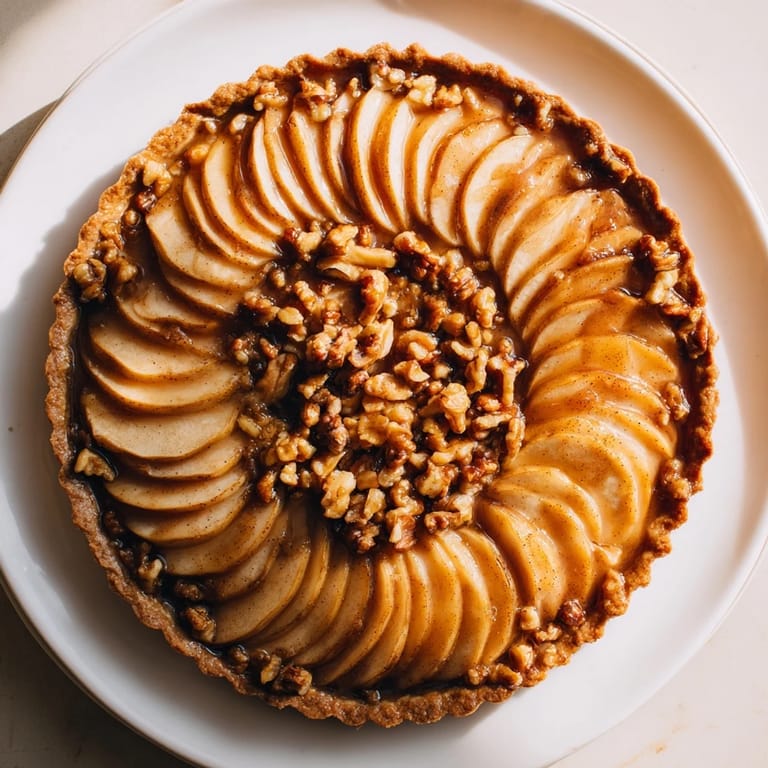
- Weave the lattice:
- This is where it looks complicated but really isn't. Lay out half your apple slices in parallel rows on a sheet of parchment, slightly overlapping and slightly fanned. Take the remaining slices and weave them over and under in the opposite direction, creating a basket-weave pattern. It's meditative work—enjoy it. Once you're happy with the pattern, gently slide the parchment and lattice onto the tart, then carefully peel away the parchment and trim the overhanging edges with a sharp knife.
- Bake with protection and reveal:
- Cover the tart loosely with foil and bake for 20 minutes—the foil protects the apples from browning too fast. Remove the foil and bake another 10 to 15 minutes until the apples are tender when you pierce them with a fork and the edges are lightly golden. The crust should be deep golden brown.
- Cool and serve:
- Let the tart rest for at least 20 minutes before slicing so the filling sets slightly. Serve warm or at room temperature, and if you want extra shine, brush the lattice with warmed apricot jam after it cools.
 Pin It
 My cousin once asked why I'd spend an hour on something that takes five minutes to eat. I didn't have a clever answer that day, but watching her slice into that tart, seeing the layers—the golden crust, the walnut honey base, the precise lattice, the tender apples—she understood without me saying anything. The hour isn't wasted time; it's the point.
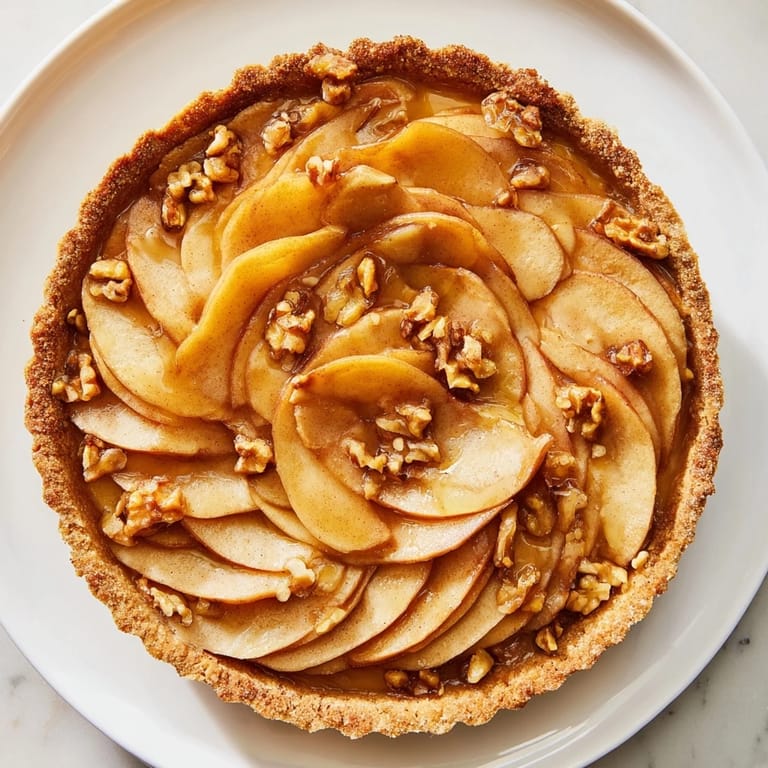
Apple Varieties and Their Role
The type of apple you choose changes the entire character of your tart. Honeycrisp apples are sweet and forgiving, staying juicy and tender without dissolving into mush. Granny Smiths keep their structure and give you that sharp tartness that cuts through the honey beautifully. If you can get your hands on Pink Lady or Braeburn, those work wonderfully too—they're sturdy enough to slice thin without falling apart, and they have enough acidity to balance the filling. The one thing to avoid is very soft apples like Red Delicious; they'll turn to applesauce in the oven and defeat the whole visual point of the lattice.
The Walnut-Honey Layer
This isn't just a flavor layer; it's structural. The honey acts as a glue and moisture barrier, keeping the crust from getting soggy while adding a subtle floral sweetness that doesn't announce itself loudly. If you want to venture into variation territory, pecans work beautifully here, or you could even try toasted hazelnuts if you're feeling adventurous. The key is that the nuts stay intact and don't turn into powder—they should be chopped to roughly almond-sized pieces so they stay visible and crunchy even after baking.
Timing, Temperature, and Troubleshooting
The oven temperature matters more than you might think. At 375°F, your apples soften and release their juices while the crust browns without burning. If your crust is browning too fast, lower the temperature slightly and extend the baking time. If your apples aren't softening, raise it slightly. Every oven has personality, so watch and adjust. One last thing: if your lattice apples start looking too dark during the final bake, that's the sugar caramelizing and that's exactly what you want—it adds a subtle bittersweet note that balances everything.
- If your crust cracks while fitting it into the pan, pinch it back together; small repairs disappear once baked.
- Slice your apples as close to baking time as possible so they don't oxidize and darken.
- Let it cool completely before slicing, or the warm filling will be too soft to cut cleanly.
 Pin It
 This tart asks you to slow down, to notice the weight of an apple slice, to care about precision without perfectionism. That's the real recipe here, and the dessert is just proof that it works.
Recipe FAQs
- → How do I create the apple lattice topping?
Slice apples very thinly, then weave half in parallel rows and the other half over and under to form a lattice pattern before transferring onto the tart.
- → What nuts work best in this dessert?
Walnuts provide a rich, crunchy texture, but pecans can be used as a flavorful alternative.
- → Can I prepare the crust ahead of time?
Yes, the crust dough can be chilled before blind baking, which helps achieve a crisp and flaky base.
- → How should the dessert be served?
It can be served warm or at room temperature, optionally with a drizzle of honey or alongside vanilla ice cream.
- → Are there gluten-free options for the crust?
Using a gluten-free flour blend instead of all-purpose flour will make the crust gluten-free and still flaky.